A Comprehensive Guide to Color Correction vs. Color Grading in Photo Editing
In the world of photo editing, two important processes help photographers and designers make their images look their best: color correction and color grading. While these terms might seem similar, they serve different purposes and are used at different stages of the editing process. Understanding the difference between them can greatly improve the quality of your photos.
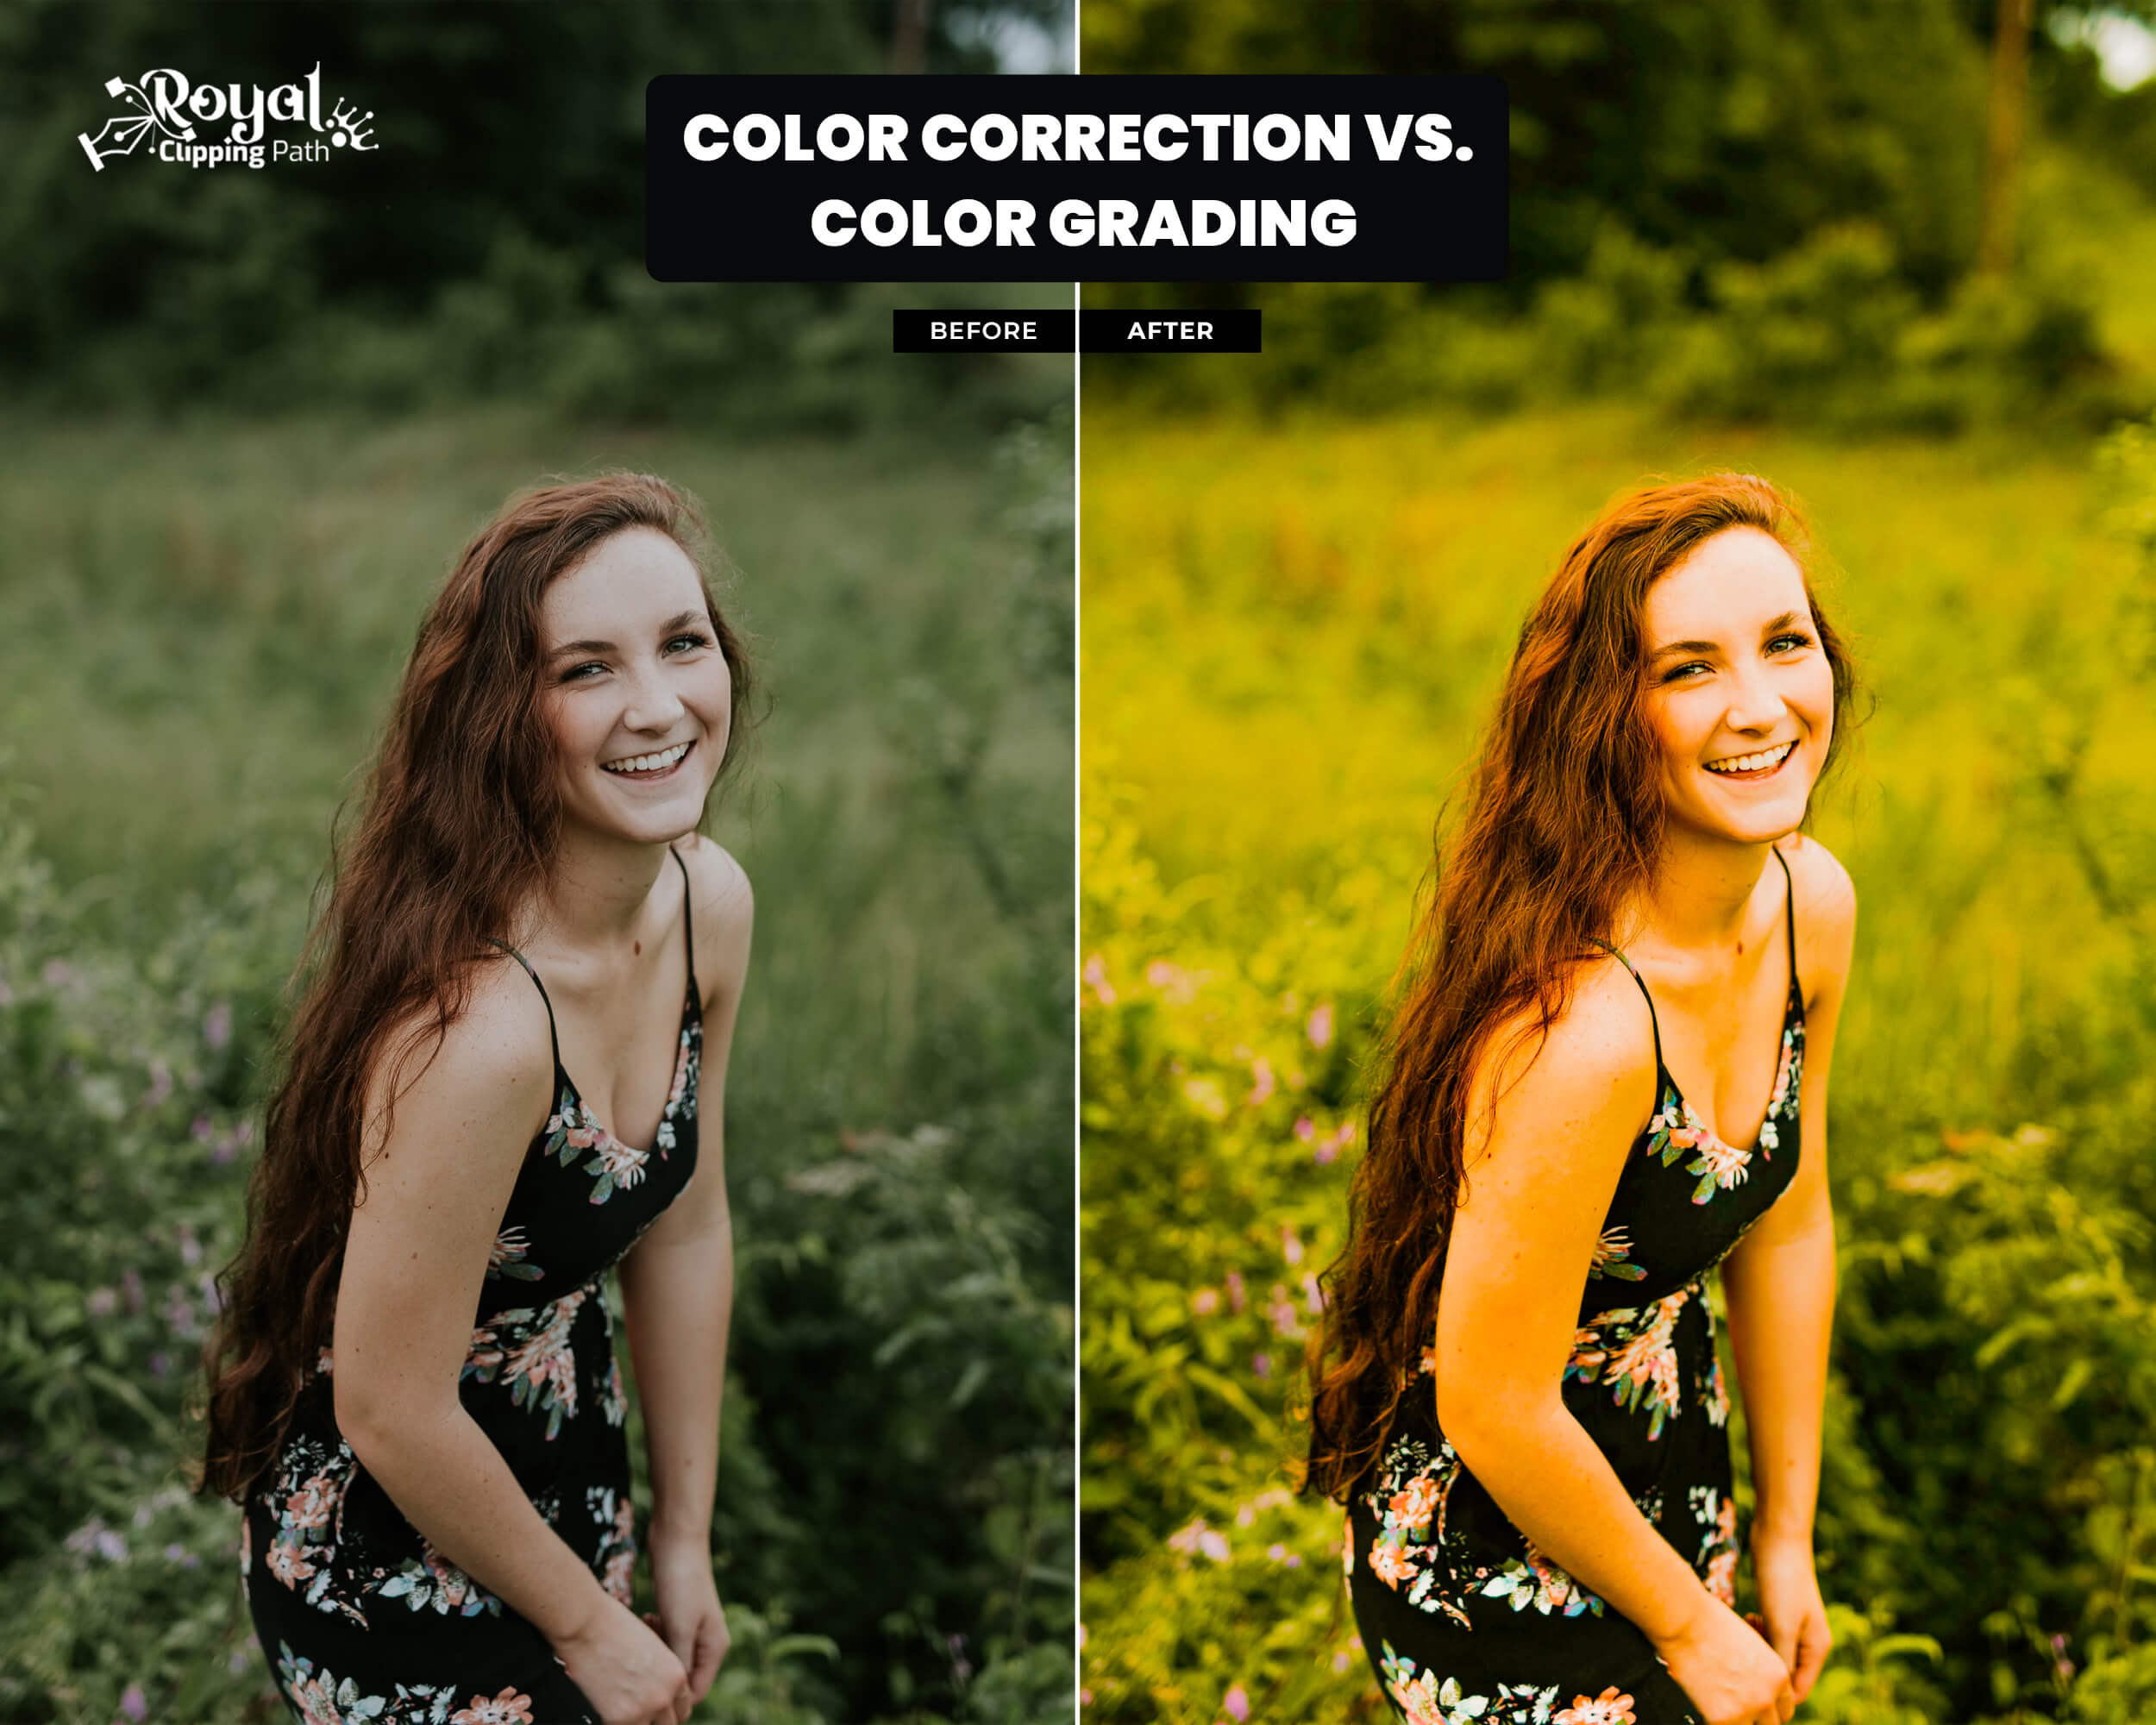
Color correction is the first step in editing an image. It involves adjusting colors to make them appear natural and balanced. This step corrects any mistakes made during the shoot, such as bad lighting, incorrect white balance, or unwanted color casts. The goal of color correction is to make the image look like what the human eye sees in real life.
On the other hand, color grading is a creative process that comes after color correction. It involves changing the colors to create a specific mood or style. Think of color grading as adding a filter or a special effect to your photo. For example, you might want to make a photo look warmer and more inviting, or cooler and more mysterious. This step helps tell a story and evoke emotions through colors.
In this guide, we will explore the differences between color correction and color grading in detail. By the end, you’ll know how to use both techniques to make your photos look professional and captivating.
What is Color Correction in Photo Editing?
Color correction in photo editing is all about making your pictures look natural and true to life. When you take a photo, sometimes the colors don’t look quite right. This can happen because of bad lighting, the wrong camera settings, or other technical issues. Color correction helps fix these problems so that the colors in your photo look just like they do in real life.
The main goal of color correction is to adjust the colors in your photo so that they are accurate and balanced. This means making sure that white objects look white, not yellow or blue, and that skin tones look healthy and natural. It also involves fixing any color casts, which are unwanted colors that can make your photo look strange.
For example, if you took a photo indoors and it looks too yellow because of the lighting, color correction can help remove that yellow tint. Or if a photo taken on a cloudy day looks too blue, color correction can make it look more natural.
Photo Color correction is usually the first step in editing a photo. It sets the stage for any further adjustments, like color grading, that you might want to do to give your photo a specific look or feel.
What is Color Grading in Photo Editing ?
Color grading in Photo Editing is the process of adjusting and enhancing the colors in an image to create a specific mood or look. Think of it like adding filters to your photos on social media, but with more control and precision.
When you take a photo, the colors might not always look exactly how you want them to. Maybe the image is too bright, too dark, or the colors look dull. Color grading helps fix these issues and can make your photos look more vibrant, dramatic, or even give them a vintage feel.
Photographers use special software like Adobe Lightroom or Photoshop to do color grading. These tools allow them to change the brightness, contrast, and color balance of an image. They can make the sky look bluer, the grass greener, or give the photo a warmer or cooler tone.
Color grading is not just about making a photo look pretty. It’s also used to tell a story or convey emotions. For example, a photo with cool, blue tones might feel calm and peaceful, while one with warm, orange tones might feel cozy and inviting.
In short, color grading is a way to enhance and transform your photos, making them more visually appealing and expressive.
The Importance Of Color Correction in Photo Editing
Color correction is an essential step in photo editing that makes your images look natural and appealing. When you take a photo, the colors might not always look true to life. This can happen because of poor lighting, camera settings, or other factors. Color correction helps fix these issues, ensuring the colors in your photos are accurate and consistent.
Imagine taking a picture of a beautiful sunset, but the photo comes out looking too blue or too dark. Color correction can adjust the colors so the sky looks as warm and golden as it did in real life. It involves changing the brightness, contrast, and color balance of the image.
Without color correction, photos might appear dull, washed out, or have strange color casts that don’t look right. This step is especially important if you’re a photographer or someone who shares photos online, as it ensures your images look professional and true to the scene you captured.
Color correction also helps in maintaining a consistent look across multiple photos. If you’re editing a series of images, color correction ensures they all have the same color tone, making them look cohesive and well-edited.
In summary, photo color correction is vital in photo editing to make sure your images are visually appealing and accurately represent the colors and mood of the original scene.
The Importance Of Color Grading in Photo Editing
Color grading is a crucial part of photo editing that helps you create the perfect mood and style for your pictures. When you take a photo, the colors might not always look exactly how you want them to. This is where color grading comes in, allowing you to enhance and change the colors to make your photo look amazing.
Imagine you took a photo on a cloudy day. The picture might look dull and grey. With color grading, you can make the colors brighter and more vibrant, or even give it a warm, sunny feel. This helps your photo stand out and look more interesting.
Photographers use special software like Adobe Lightroom or Photoshop to do color grading. These tools let them adjust the brightness, contrast, and color balance of the image. For example, you can make the blue sky look even bluer or give the whole photo a golden glow.
Color grading is not just about making photos look pretty. It’s also about telling a story and setting a mood. For example, a photo with cool, blue tones might feel calm and peaceful, while one with warm, orange tones might feel cozy and inviting.
In short, color grading is important in photo editing because it helps you enhance and transform your photos. It makes them look more professional, visually appealing, and better at conveying the emotions or story you want to share.
Tips to Improve Color Correction and Grading
- Use Proper Software:
- Choose good software for color correction and grading. Programs like Adobe Lightroom or DaVinci Resolve are popular.
- Adjust White Balance:
- Fix the white balance first. This makes sure the colors look natural. If the photo looks too blue or yellow, adjust the white balance to correct it.
- Work on Exposure:
- Make sure the photo is not too dark or too bright. Adjust the exposure to get the right brightness.
- Balance Colors:
- Use the color balance tool to fix any color issues. If there is too much of one color, like red or green, adjust it to make the photo look balanced.
- Use Presets:
- Many software programs have presets for color correction and grading. These are ready-made settings that can quickly improve your photos.
- Check Skin Tones:
- When correcting photos of people, make sure their skin tones look natural. Adjust the colors to avoid making skin look too red or too yellow.
- Use Layers:
- Work on different layers. This helps you make changes without affecting the whole photo. You can always go back and adjust specific layers if needed.
- Use Histogram:
- Check the histogram. This graph shows you the brightness levels in your photo. It helps you see if the photo is properly exposed and balanced.
- Practice:
- Keep practicing. The more you work on color correction and grading, the better you will get.
- Seek Feedback:
- Ask others for feedback on your color correction and grading. They might notice things you missed and help you improve.
Using these tips can greatly improve your color correction and grading. Good color correction makes photos look natural and beautiful. With practice, your skills will improve, and your photos will look their best.
Where to Outsource Color Correction and Color Grading Service If You Need?
If you need color correction and color grading services for your photos, outsourcing to professionals can save you time and ensure high-quality results. Here are some places where you can find these services:
- Freelance Platforms:
- Websites like Upwork and Fiverr have many freelancers who specialize in color correction and color grading. You can browse through their portfolios, read reviews from other clients, and choose the one that fits your needs and budget.
- Professional Photo Editing Companies:
- There are companies that offer photo editing services, including color correction and grading. Examples include FixThePhoto, ColorExperts, and Clipping Path India. These companies have teams of skilled editors who can handle large volumes of work and deliver consistent results.
- Online Marketplaces:
- Websites like Etsy or Creative Market sometimes have professional editors offering their services. These platforms are easy to navigate and often have customer reviews to help you make a decision.
- Photography Forums and Communities:
- Online communities like Reddit’s photography subreddits or specialized forums often have sections where professionals offer their services. You can also ask for recommendations from other photographers.
- Social Media:
- Platforms like Instagram and LinkedIn can be good places to find freelance photo editors. Many professionals showcase their work on these platforms, and you can contact them directly to discuss your project.
- Local Photography Studios:
- If you prefer working with someone local, check out photography studios in your area. Many studios offer color correction and grading services, or they might be able to recommend a trusted freelancer.
When choosing a service, consider the following tips:
- Check Portfolios: Look at examples of their previous work to ensure their style matches what you’re looking for.
- Read Reviews: Customer reviews can provide insights into the quality and reliability of their services.
- Discuss Your Needs: Clearly communicate your requirements and expectations to ensure they understand what you want.
- Compare Prices: Get quotes from multiple providers to find a service that fits your budget.
Outsourcing color correction and color grading can help you achieve professional-looking photos without the hassle, leaving you more time to focus on other aspects of your work or hobby.
You can check : Types of Masking in Photoshop
Frequently Asked Questions (FAQ) on Color Correction and Color Grading in Photo Editing
Q1: What is color correction?
A: Color correction is fixing the colors in a photo to make them look natural and accurate. It adjusts brightness, contrast, and color balance to ensure the photo looks like it did in real life.
Q2: What is color grading?
A: Color grading is enhancing and changing the colors in a photo to create a specific mood or style. It can make your photos look warmer, cooler, more vibrant, or give them a unique artistic touch.
Q3: Why do I need color correction and grading services?
A: These services help make your photos look professional and visually appealing. They can correct any color issues and enhance the overall look of your photos, making them stand out.
Q4: How do I choose a color correction and grading service?
A: Look for services with good reviews and a portfolio that matches your style. Compare prices and make sure to communicate your needs clearly to ensure they understand what you want.
Q5: How long does it take to get my photos edited?
A: The time can vary depending on the number of photos and the complexity of the edits. Most services will give you an estimated time when you place your order.
Q6: How much does it cost?
A: Prices can vary based on the service provider and the amount of work needed. It’s a good idea to get quotes from a few different providers to find one that fits your budget.
Q7: Can I see a sample before I commit?
A: Many services offer a sample edit so you can see the quality of their work before you commit to a full order. It’s a good way to make sure you’re happy with their style.
Q8: What if I’m not satisfied with the results?
A: Most services offer revisions or a satisfaction guarantee. Make sure to check their policy on revisions before you place your order.
Q9: Do I need to provide any specific information or files?
A: Yes, usually you’ll need to provide the original photos and any specific instructions on how you want them edited. Clear communication helps ensure you get the results you want.
Q10: Can these services handle large batches of photos?
A: Yes, many professional services can handle large volumes of photos efficiently. Be sure to discuss your needs with them to ensure they can meet your deadlines.
Conclusion
In summary, color correction is the process of ensuring accurate color representation, while color grading is the process of enhancing the aesthetic of an image. Understanding the differences between these two techniques can help photographers achieve the desired look and improve their overall photo editing skills. By mastering color correction and color grading, photographers can create visually stunning images that accurately capture the scene and evoke the desired mood.